The pre-treatment step is for removal of gel and to minimize risk for cross contamination.
Pre-Treatment at the Point of Use (Required for all Vscan Air probes)
1. After each use,
- Remove the protective sheath from the Vscan Air if used.
- Gently remove all coupling gel from the Vscan Air by wiping with a soft, low lint cloth
CAUTION: Do not use abrasive paper products when cleaning or wiping a GE HealthCare ultrasound probe. The use of abrasive wipes can damage the soft lens (acoustic window)- To extend the life of the Vscan Air probe lenses, pat dry only
2. Wipe the Vscan Air with one of the wipes (listed in the website GE HealthCare/Transducers) from the lens of one transducer to the other. Dispose the cloth, wipe and gloves in the clinical trash.
3. After each use, inspect the lenses and housing of the Vscan Air. Look for any damage that would allow liquid to enter the Vscan Air
DANGER: If the Vscan Air probe is damaged, do not place it into any liquid (e.g., for disinfection) and do not use it until it has been inspected and repaired/replaced by a GE HealthCare Service Representative.
WARNING: Avoid processing procedures and chemicals that may damage the probe, such as: Do not steam
autoclave or subject or the probe to Ethylene Oxide (ETO).
Manual Cleaning Instructions
Manual cleaning is required to ensure the Vscan Air CL is cleaned to the extent necessary for further processing.
When cleaning select one of the cleaning methods described below, cleaning using wipes or cleaning using a cleaning solution.
Cleaning Using Wipes
- Dispense a cleaning wipe from the wipe canister.
- Hold the Vscan Air probe with the large lens facing away from your body.
- Gently wipe the Vscan Air probe with a cleaning wipe along the length of the Vscan Air probe. Gently wipe the Vscan Air probe large lens.
- Rotate the Vscan Air probe and wipe the surface of the Vscan Air probe. As the wipe becomes visibly soiled, discard the wipe into clinical trash and dispense fresh wipes as needed.
- Wrap a clean wipe around a soft nylon bristle brush to access crevasses on the surface of the Vscan Air probe. Do not use the brush on the Vscan Air probe lenses.
- Turn the Vscan Air probe so that the small lens is facing away from your body.
- Gently wipe the Vscan Air probe with the cleaning wipe along the length of the Vscan Air probe. Gently wipe the Vscan Air probe small lens.
- Rotate the Vscan Air probe and continue wiping until the entire surface of the Vscan Air probe has been wiped.
- Visually inspect the Vscan Air probe for any remaining soil and, if necessary, repeat steps 2 through 8 until the Vscan Air probe is visibly clean.
NOTE: Pay special attention to lenses, edges and groves.Cleaning using a cleaning solution
- Prepare a basin with enzymatic cleaner per the manufacturer’s instructions.
- Immerse probe in the cleaning solution and ensure no air bubbles are trapped.
- Use a soft nylon bristle brush to clean the probe. Do Not use the brush on the probe lenses as this can damage the soft acoustic lens.
- Ensure the probe remains in the cleaning solution for the minimum contact time listed on the enzymatic cleaner label. Make sure to follow manufacturers’ recommendations.
- Visually inspect the probe and probe components for soil. Repeat steps 4 - 6 until all visible soil has been removed from the surface of the probe.
- Thoroughly rinse the probe to remove traces of the cleaner solution. Follow the cleaner manufacturers’ instructions.
- Visually inspect the device in a well-lit area to ensure all surfaces are free from residual cleaning solution. Repeat Step 6 if visible cleaning solution is observed.
- Thoroughly pat dry the probe using a clean low-lint soft, dry disposable cloth or wipe. Do not use abrasive paper products
Choosing A Disinfectant
Refer Cleaning and Disinfection section to determine which level of disinfection to use
Low-Level/Intermediate Level Disinfection With Wipes
- Use a clean set of gloves.
- Hold the Vscan Air probe with the large lens facing away from your body.
- Wipe the Vscan Air probe from the large lens to the small lens, slightly rotating the Vscan Air probe after each wiping pass.
- Turn the Vscan Air probe so that the small lens is facing away from your body.
- Use a new wipe and apply to the small lens. Now, wipe the Vscan Air probe from the small lens to the large lens, slightly rotating the Vscan Air probe after each wiping pass.
- Once the Vscan Air probe has been completely wiped, use additional wipes and continue wiping the Vscan Air probe as needed to ensure all surfaces remain wet for the required exposure time listed on the disinfectant manufacturer’s label.
- Dry all surfaces of the Vscan Air probe using a sterile, lint-free, soft wipe or cloth or pat the lenses dry.
High-Level Disinfection – Soak
High-Level Disinfection is required for devices that contact non-intact skin.
In order for cleaner to be effective, all visible residue must be removed during the cleaning process. Follow the cleaning instructions as given in ‘Manual cleaning Instructions’ to clean the probe before performing disinfection.
- Prepare a basin with the high-level disinfectant per the manufacturer’s instructions for use. Be sure to follow all precautions for storage, use and disposal. Observe specifically soak times and dilution rates.
- Immerse cleaned and dried probe in the disinfectant for the time specified by the chemical manufacturer and ensure no air bubbles are trapped.
- Thoroughly rinse the probe to remove traces of the disinfectant. Follow the disinfectant manufacturers instructions.
- Thoroughly dry all surfaces of the device using a sterile, lint-free wipe or cloth, changing wipes/ cloths when necessary to ensure the device is completely dry.
WARNING: Do not soak probes in cleaner for longer than stated by the chemical manufacturers instructions for use. Extended soaking may cause probe damage and early failure of the enclosure, resulting in possible electric shock hazard.High-Level Disinfection - trophon® EPR and trophon®2
1. This automated disinfection replaces the manual HLD, but manual cleaning still needs to be performed prior to automated HLD. See Manual cleaning Instructions on page 312.
2. Follow the trophon instructions for probe placement and operation of the trophon system.
NOTE: A trophon Wireless Ultrasound Probe Holder is required to hold the Vscan Air probe in the trophon chamber. GE HealthCare offers this holder as an accessory to the Vscan Air.3. Once the trophon High-Level Disinfection cycle is complete, use necessary precautions (e.g. gloves), as directed by your facility and promptly remove the probe from the trophon machine. DO NOT store the probe in the trophon chamber.
4. Wipe the probe with a clean, low-/non-linting, soft cloth or wipe to remove any residual hydrogen peroxide from the probe surface.
5. If the probe is not immediately reused, store the probe in a manner that will protect and keep the probe from being recontaminated
Covering The Vscan Air Probe using A Sterile, Protective Sheath
CAUTION: Protective barriers may be required to minimize disease transmission, but their use does not replace cleaning and disinfection. Probe sheaths are available for use with all clinical situations where infection is a concern. Use of legally marketed, sterile probe sheaths is recommended for interventional procedures including biopsy
1. Place an appropriate amount of gel inside the protective sheath and/or on the transducer face.
NOTE: Failure to use imaging gel may result in poor image quality2. Insert Vscan Air Probe into sheath, making sure to use proper sterile technique. Pull cover tightly over Vscan Air face to remove wrinkles and air bubbles, taking care to avoid puncturing the sheath.
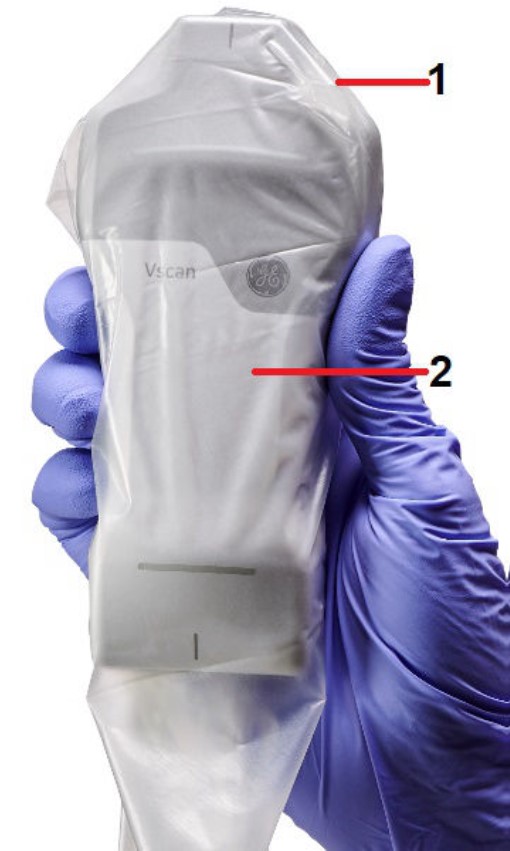
Applying the Sheath
- Protective sheath
- Vscan Air with the Protective sheath
3. Secure the sheath in place. (Note: If using a rubber band for securing the sheath make sure that it does not affect the probe power button)
4. Inspect the sheath to ensure there are no holes or tears. If the sheath becomes compromised, stop the procedure and replace immediately.
5. After usage, discard the sheath into clinical trash.
Cleaning The Protective Case
The protective case is compatible with the set of cleaners and disinfectants listed for the Vscan Air probe. When cleaning the protective case pay special attention to its edges and grooves. Requirements for the protective case cleanliness will be defined by the way the protective case is implemented in the workflow for storing the Vscan Air probe. Cleaning of the protective case will be required if the Vscan Air probe was not properly cleaned of disinfected before it was storage in the protective case

Protective case
Chemicals Compatible With Vscan Air Probe
The table below lists the chemicals that were tested for compatibility with the probes.
Trade Name | Manufacturer |
3M MBS Disinfectant Cleaner Concentrate | 3M |
Alcohol 70% Ethanol on a wipe | All manufacturer |
Alcohol 70% Isopropanol on a wipe | All manufacturer |
Anioxyde 1000 | Laboratories Anios |
Bacillol 30 Foam/Tissues | BODE Chemie GmbH (HARTMANN) |
Bacillol AF Liquid/Spray/Tissues | BODE Chemie GmbH (HARTMANN) |
CaviWipes 1 | Metrex |
Cidex OPA | Advanced Sterilization Products |
Cidezyme/Enzol | Advanced Sterilization Products (J&J) |
Cleanisept Wipes forte | Dr.Schumacher GmbH |
DisOPA | Advanced Sterilization Products |
Dispatch hospital cleaner disinfectant towels with bleach | CloroxPro |
Kao Cleaning Wipe | Kao Corporation |
Matrix Wipes | Whiteley Medical |
Mikrobac forte | BODE Chemie GmbH (HARTMANN) |
Trade Name | Manufacturer |
Mikrobac tissues | BODE Chemie GmbH (HARTMANN) |
mikrozid sensitive or mikrozid alcohol free (liquid and wipes) | Schulke & Mayr GmbH |
mikrozid universal liquid and mikrozid universal wipes | Schulke & Mayr GmbH |
NUGEN MB5A Series | Lonza Inc. |
Protex ULTRA Disinfectant Wipes | Parker Laboratories Inc |
Reynard Premier Detergent & Disinfectant Wipes | Reynard Health Supplies |
Sani-Cloth Active (Ecolab) | Ecolab |
Sani-Cloth Active (PDI) | PDI |
Sani-Cloth AF3 Germicidal Disposable Wipe | PDI |
Sani-Cloth Prime Germicidal Disposable Wipe | PDI |
Sekusept Aktiv | Ecolab |
Septiwipes | Dr.Schumacher GmbH |
SONO Ultrasound Wipes | Advanced Ultrasound Solutions Inc |
Super Sani-Cloth Germicidal Disposable Wipe | PDI |
Surfa'Safe Premium | Laboratories Anios |
Tristel Pre-Clean Wipes | Tristel Solutions Limited |
Tristel Rinse Wipes | Tristel Solutions Limited |
Tristel Trio Wipes System* | Tristel Solutions Limited |
trophon Companion Cleaning Wipes | Nanosonics |
trophon EPR** | Nanosonics |
trophon2** | Nanosonics |
Wip'Anios Excel | Laboratories Anios |
Disclaimer: * Disinfection with Tristel Trio Wipes System may cause discoloration of the lightbar, the button and the soft plastic surrounding the battery door. Such color change does not impact the performance, safety or lifetime of the probe. If color change occurs due to disinfection with Tristel Trio Wipes System, Vscan Air probes will not be repaired or replaced under warranty or contract agreements.
Disclaimer: ** High usage of trophon devices may cause discoloration of the lightbar, the button and the soft plastic surrounding the battery door. Such color change does not impact the performance, safety or lifetime of the probe. If color change occurs due to disinfection in trophon chamber, Vscan Air probes will not be repaired or replaced under warranty or contract agreements.

WARNING
Products listed might not be available in all countries. Check with your local infection control authorities or
product manufacturer. GE HealthCare warranties and service contracts do not cover, and GE HealthCare is
not responsible for, damages caused by cleaning, disinfection or gel products that are not compatible with GE
HealthCare probes.
A complete list of compatible products is also available on the Ultrasound Probes website. This list updates periodically with new products.
Ultrasound Probes web site |
https://www.gehealthcare.com/products/ultrasound/ultrasound-transducers |
Disclaimer: The information herein is not intended to replace the product’s User Manual. Please consult the User Manual for comprehensive information and cautionary guidance about the product’s operation and use.